
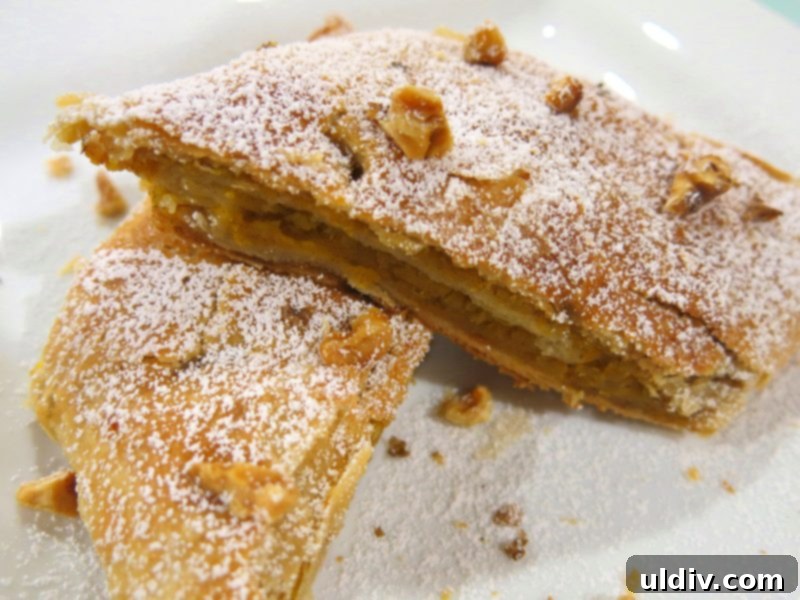
Easy & Economical Pumpkin Strudel: A No-Egg, No-Butter Delight for Any Occasion
For many home bakers, the thought of making pastry dough from scratch can be quite daunting. The intricate steps, the precise measurements, and the fear of a tough or dry crust often deter even experienced cooks. I confess, I’ve shared this apprehension for years! However, a recent gift from my mother-in-law has completely transformed my perspective on homemade pastries. She shared an incredible strudel recipe that is not only surprisingly easy to make but also remarkably economical. This unique dough requires no eggs and no butter, making it a fantastic option for various dietary preferences and a budget-friendly choice, all without compromising on its delightful flavor or flaky texture. Get ready to discover your new favorite dessert, perfect for any season or celebration!
Embracing the Versatility and Charm of Homemade Strudel
Strudel, with its origins deeply rooted in Austrian culinary tradition, is much more than just a pastry; it’s a celebration of tender, multi-layered dough embracing a delectable filling. Its widespread appeal lies in its incredible versatility and the comforting joy it brings to any table. Growing up, apple strudels were a cherished staple in my home, a sweet reminder of family gatherings and cozy afternoons. My husband, on the other hand, developed a strong fondness for ricotta and raisin strudel, often requesting it for special occasions. The true beauty of strudel is its adaptability; it can accommodate countless flavors, from sweet fruit fillings to savory vegetable or cheese combinations. This particular recipe, a light-as-a-feather pumpkin strudel, truly showcases how adaptable and universally loved this classic dessert can be.
Just recently, I brought a batch of this delightful pumpkin strudel to a pre-Thanksgiving gathering at work, and it was an absolute showstopper. The compliments flowed freely, and it quickly became the star of the dessert table. Its delicate texture, subtly spiced pumpkin filling, and a graceful dusting of powdered sugar elevate any meal, making it an ideal choice for festive holidays like Halloween, Christmas, or, of course, the grand Thanksgiving feast. This strudel is so irresistibly delicious and relatively simple to prepare that it has quickly become a regular request in our household, a testament to its enduring charm and comforting appeal. Prepare to make it again and again!
Unveiling the Economical Strudel Dough: A Two-Step Secret to Flakiness
The genius of my mother-in-law’s recipe truly lies in its innovative “two-step process” for creating the dough. Don’t let the phrase “two steps” intimidate you; while it might seem a tad more involved at first glance, the method is remarkably straightforward, and the incredible, flaky results are more than worth the minimal effort. This unique approach yields a wonderfully pliable dough that bakes into a crisp, multi-layered pastry without the need for traditional enrichments like eggs or butter. This makes it not only a healthier option for those mindful of fat intake but also a fantastic choice for individuals with allergies or specific dietary restrictions. An added benefit of this specific dough recipe is that it contains no added sugar, allowing the sweetness of your strudel to come solely from the delicious filling and the decorative powdered sugar sprinkled on top. This provides excellent control over the final sweetness, letting you customize it perfectly to your family’s taste preferences.
Crafting Your Perfect Spiced Pumpkin Filling
The heart and soul of any great strudel is its filling, and this pumpkin filling recipe is a harmonious blend of sweet and warming spiced flavors, making it absolutely perfect for autumn and winter festivities. Preparing this delectable filling is a simple process, primarily focusing on gently cooking the pumpkin to reduce its moisture content and concentrate its rich, natural flavor.
Ingredients for the Spiced Pumpkin Filling:
- Grated flesh from 1 medium pumpkin (approximately 3-4 cups once grated, ensure a firm baking pumpkin like a sugar or pie pumpkin)
- 1/2 cup granulated sugar (feel free to adjust this amount; add more for a sweeter filling or slightly less if your pumpkin is naturally very sweet)
- 1 tablespoon ground cinnamon (using high-quality, fragrant cinnamon will significantly enhance the overall flavor profile)
- Optional: A small pinch of ground nutmeg, ginger, or cloves for an added layer of warm, aromatic spice.
Step-by-Step Preparation Instructions for the Pumpkin Filling:
- Begin by preparing your chosen pumpkin. Thoroughly wash the pumpkin, then carefully peel its skin, scoop out all the seeds and fibrous strands from its cavity. Once cleaned, grate the pumpkin flesh using a standard box grater or a food processor equipped with a grating attachment.
- Transfer the grated pumpkin into a large, heavy-bottomed saucepan or a deep skillet. Place the pan over medium heat. The primary objective at this stage is to gently cook the pumpkin until it becomes tender and, crucially, to significantly reduce its moisture content. This step is vital for preventing a soggy strudel.
- Cook the pumpkin for approximately 15 minutes, stirring occasionally to prevent it from sticking to the bottom of the pan and to ensure even cooking. You will observe the pumpkin softening and releasing a noticeable amount of liquid. Continue cooking until most of this liquid has evaporated, and the pumpkin mixture becomes visibly thicker, almost jam-like in consistency.
- Once the pumpkin is tender and has shed much of its moisture, stir in the ground cinnamon. If you’ve chosen to include additional spices like nutmeg, ginger, or cloves, add them at this point to allow their flavors to meld.
- Continue to cook the mixture for another 5 minutes, allowing the spices ample time to bloom and fully integrate with the cooked pumpkin. This brief cooking period deepens the spice flavors.
- Carefully taste the filling and adjust the sweetness and spice levels as necessary to suit your preference. If you desire a sweeter dessert, gradually add more granulated sugar, stirring continuously until it is completely dissolved. For a more pronounced spice flavor, an extra pinch of cinnamon or your chosen spice can be added.
- Remove the pan from the stove and set the pumpkin filling aside to cool completely. It is absolutely essential that the filling is cold or at least at room temperature before it is spread onto the dough, as warm filling can negatively affect the delicate texture of the pastry dough.
The Ingenious Two-Part Strudel Dough: Building Flaky Perfection
This unique dough construction is precisely what makes this strudel recipe truly exceptional. By preparing two distinct “dough elements” and then combining them through a specific layering technique, we achieve a wonderfully flaky and tender pastry without the need for traditional, high-fat ingredients like butter. This ingenious method, a treasured technique passed down through generations, ensures an exceptionally light, crisp, and multi-layered strudel every single time you bake it.
Dough Element #1: The Elastic, Yeast-Leavened Base
This initial dough forms the foundational, elastic structure of our strudel. It provides a subtle rise and a pleasant chewiness, thanks to the active dry yeast. This element is a straightforward combination of ingredients that comes together remarkably quickly and easily, serving as the canvas for our flaky masterpiece.
Ingredients for Dough Element #1:
- 2 cups all-purpose flour (standard plain flour is perfect here)
- 1/2 cup vegetable oil (or any other neutral-flavored cooking oil, such as canola or sunflower oil)
- 1 packet (approximately 2 1/4 teaspoons) active dry yeast
- 1 cup water at room temperature (ensure it’s not too hot or too cold, as this affects yeast activation)
- 1 extra tablespoon water (lukewarm, specifically for activating the yeast)
- 1 teaspoon fine sea salt
Step-by-Step Preparation Instructions for Dough Element #1:
- In a large mixing bowl, measure out and place the 2 cups of all-purpose flour. Create a small well in the center of the flour.
- In a separate, smaller cup or bowl, combine the active dry yeast with the extra 1 tablespoon of lukewarm water. Stir this mixture gently until the yeast begins to dissolve. Allow it to sit undisturbed for about 5-10 minutes. During this time, the yeast should become foamy and bubbly, which is a clear indication that it is alive and properly activated.
- Pour the activated yeast mixture directly into the well you created in the flour in the large bowl.
- Next, add the 1/2 cup of vegetable oil, the 1 cup of room-temperature water, and the 1 teaspoon of salt to the bowl with the flour and yeast.
- Using your clean hands or a stand mixer fitted with a dough hook attachment, mix all the ingredients thoroughly. Continue to mix and knead until a smooth, cohesive, and homogeneous dough forms. It should be soft, pliable, and possess a slight elasticity. Knead for a few minutes beyond initial combining to ensure all ingredients are fully integrated.
- Once the dough is well-formed, cover the mixing bowl with a clean kitchen towel or a sheet of plastic wrap. Allow the dough to “rest” at room temperature for at least 15-20 minutes. This essential resting period allows the gluten to relax, making the dough much easier to roll out later without excessive resistance or shrinking.
Dough Element #2: The Oil-Based Layer for Flakiness
This second dough element is absolutely crucial for creating the distinctive, delicate, and wonderfully flaky layers that are characteristic of a truly exceptional strudel. It’s more akin to a thick, soft paste than a traditional dough, specifically designed to be spread as an inter-layer between sections of Dough Element #1.
Ingredients for Dough Element #2:
- 1 3/4 cups all-purpose flour
- 1 cup vegetable oil (or any neutral-flavored oil as used in Dough Element #1)
Step-by-Step Preparation Instructions for Dough Element #2:
- In a separate, medium-sized mixing bowl, begin by placing approximately one-third of the 1 3/4 cups of all-purpose flour.
- Add about one-third of the 1 cup of vegetable oil to this portion of flour.
- Using a fork or a pastry blender, thoroughly mix the flour and oil together until a coarse, crumbly, yet somewhat cohesive mixture forms.
- Gradually continue adding the remaining flour and oil in alternating increments, mixing diligently after each addition. The key is to achieve a final consistency similar to that of thick sour cream or a very soft, spreadable paste. It should be smooth and easily spreadable, not stiff or lumpy. This careful, gradual process ensures that the oil is fully incorporated into the flour without overworking the gluten, which is vital for achieving that desired flaky texture.
Step-by-Step Assembly and Baking Your Golden Pumpkin Strudel
Now comes the most exciting part – bringing the two distinct dough elements together and incorporating our delicious pumpkin filling to create the multi-layered magic of strudel!
Layering the Dough for Flaky Perfection:
- On a clean, dry work surface that has been lightly floured to prevent sticking, take “Dough Element #1” (the yeast-leavened dough). Using a rolling pin, carefully roll it out into a large, thin rectangle, aiming for a thickness of approximately 1/4 inch. Strive for a relatively uniform shape, as this will facilitate even spreading of the second dough element.
- Once Dough Element #1 is rolled out, use a fork or a spatula to carefully and evenly spread “Dough Element #2” (the oil-flour paste) over the entire surface of the rolled dough. Ensure you apply a consistent layer from edge to edge to achieve uniform flakiness throughout the strudel.
- With both dough elements layered, tightly roll the entire dough, starting from one of the longer sides, into a neat, firm cylinder. This crucial step creates the internal layers that will become wonderfully crisp and flaky upon baking.
- Cover the rolled dough cylinder loosely with plastic wrap or a clean kitchen towel and allow it to “rest” for approximately 15 minutes at room temperature. This brief but important resting period allows the dough to relax, making it much easier to roll out again in the next step without it springing back excessively.
Filling and Shaping Your Strudel:
- While the dough is resting, preheat your oven to 350°F (175°C). Ensure your oven is fully preheated before placing the strudel inside.
- Return to your prepared work surface. Take the rested dough cylinder and, once again, roll it out into a large, thin rectangle, aiming for a consistent thickness of about 1/4 inch. Work gently but with enough pressure to achieve evenness.
- Evenly spread the completely cooled pumpkin filling over the entire surface of the rolled-out dough. Make sure to leave a small border (about 1/2 inch) free from filling around all the edges. This border helps prevent the filling from oozing out during the rolling and baking process.
- Carefully roll the dough again, starting from one of the longer sides, into a neat, compact cylinder. Gently pinch the seams and the ends of the dough to securely seal the pumpkin filling inside.
- Transfer the rolled strudel to a baking tray. A glass baking dish works wonderfully for even heat distribution, but any standard oven-safe baking sheet will suffice. There is no need to butter or oil the tray, as the dough itself contains ample oil to prevent sticking.
- Using a sharp knife, make several small, shallow incisions (about 1 inch apart) across the top surface of the strudel. These strategic cuts allow steam to escape during baking, which helps prevent the strudel from bursting and promotes more even baking.
- Finally, lightly moisten the entire top surface of the dough with a small amount of water. You can do this by gently patting it with wet hands or using a pastry brush. This moisture helps the granulated sugar adhere and caramelize beautifully during baking.
- Generously sprinkle approximately 1/2 cup of granulated sugar evenly over the moistened top of the strudel. This sugar will bake into a delightful, slightly crisp, and golden crust, adding another layer of texture and sweetness.
Baking Your Golden Strudel to Perfection:
- Carefully place the baking tray with the prepared strudel into the preheated oven.
- Bake for approximately 45 minutes, or until the strudel achieves a beautiful, deep golden-brown color and feels firm and dry to the touch. The exact baking time may vary slightly depending on your individual oven’s calibration, so it’s always best to keep a close eye on it, especially towards the end of the baking cycle.
- Once baked to perfection, carefully remove the strudel from the oven.
- Allow the strudel to cool down completely on the baking tray for at least 20-30 minutes before attempting to slice it. Cooling is crucial as it allows the delicious pumpkin filling to set properly and ensures cleaner, more defined slices.
Serving Suggestions and Convenient Storage Tips
Your freshly baked, golden pumpkin strudel is a treat to behold and an even greater delight to taste! Once sufficiently cooled, it’s ready to be proudly presented as a show-stopping dessert for your guests or a comforting indulgence for your family.
Exquisite Presentation and Garnishes:
- Using a sharp, serrated knife, carefully slice the strudel into individual portions. A thickness of about 1 to 1.5 inches per slice is generally ideal.
- Artfully arrange the slices on an elegant serving platter to showcase their beautiful layers.
- For a classic and visually appealing finish, generously dust each slice with a light layer of powdered sugar. The delicate white powder provides a stunning contrast to the strudel’s golden-brown crust.
- To add an extra layer of delightful texture and a nutty flavor, consider sprinkling toasted chopped walnuts or pecans over the powdered sugar. The pleasant crunch of the nuts perfectly complements the soft, spiced pumpkin filling.
- For an indulgent and truly decadent experience, consider serving your strudel warm alongside a generous dollop of freshly whipped cream or a scoop of rich vanilla bean ice cream. The cool, creamy texture provides a wonderful counterpoint to the warm, flaky pastry, creating an unforgettable dessert experience.
Convenient Storage and Make-Ahead Options:
One of the many fantastic conveniences of this strudel recipe is its inherent flexibility for make-ahead preparation and storage. The delicious pumpkin filling, if you happen to have any leftovers or wisely choose to make a double batch, can be stored in an airtight container in the refrigerator for up to one week. This makes it incredibly convenient for individuals with busy schedules, as you can prepare the filling a few days in advance and then assemble and bake the strudel closer to your desired serving time.
In our home, this approach is a game-changer. We often prepare one batch of strudels one weekend and then another batch the following weekend, taking full advantage of the pre-made filling to enjoy this delightful treat more frequently without the added stress of a weekday rush. This strategy allows us to savor homemade goodness with ease.
I genuinely hope you find as much joy in making and savoring this economical and easy pumpkin strudel as my family and I do. It’s a recipe that not only promises delicious results but also creates fond memories and offers a delightful experience for any celebration, grand holiday, or simple gathering. Happy baking, and may your Thanksgiving be filled with warmth, gratitude, and delicious homemade treats!