
Embracing the Sweetness of Change: Nostalgic Homemade Jam Cookies
The crispness in the Chicago air has become undeniable these past few days, a subtle yet persistent whisper that summer’s vibrant reign is gently, and perhaps too swiftly, yielding to the embrace of autumn. While many eagerly anticipate the advent of cozy sweaters, pumpkin spice lattes, and fiery foliage, a familiar, wistful melancholy often settles upon me with the encroaching fall. The weather has been unusually mild, offering cool, refreshing overnight temperatures and pleasant highs in the ’70s, which only amplifies this bittersweet transition. I’ve noticed the birds, their calls more urgent, as they gather and prepare for their long migration to warmer climes – a poignant annual reminder of how quickly seasons pass. Why does summer, with its boundless energy and long, sun-drenched days, always seem to depart so rapidly? It’s a question I ponder each year, and the answer remains as elusive as ever.
Yet, amidst this annual sentimentality, a beacon of warmth and positivity emerged from an unexpected source: my wonderful mother. She has been visiting for nearly a month, and sensing my quiet struggle with the changing season, she proposed a delightful remedy – baking. There’s something profoundly comforting about the act of baking, a timeless ritual that transforms simple ingredients into something truly magical. We pulled out her cherished recipe binder, a veritable treasure trove of culinary history, meticulously leafing through pages filled with handwritten notes and splattered stains, each telling its own story. Our search ended serendipitously on a recipe that instantly transported me back to my earliest memories: her legendary jam cookies, a confectionery cornerstone of my childhood.
Mom’s Classic Jam Cookies: A Journey Through Time and Taste
These weren’t just any cookies; they were “the cookies of my childhood,” as I affectionately call them. Mom often baked these delightful treats when I was growing up, primarily because they were incredibly quick to prepare and remarkably economical, making them a staple in our home. The aroma alone was enough to fill our entire house with an irresistible warmth and anticipation. I have vivid, almost cinematic, recollections of her bustling around the oven, her movements a blur of unstoppable energy and infectious enthusiasm. Tray after tray of golden-brown, fresh-smelling cookies emerged, only to be swiftly replaced by new batches, ensuring a constant and abundant supply of these beloved delights. She knew how much my dad and I adored these moist, melt-in-your-mouth cookies, so she always made enormous quantities, striving to keep our cookie jars perpetually replenished. The sheer joy of helping her in the kitchen, carefully cutting out shapes and sneaking tastes of the raw dough, is etched deeply into my memory. Baking them was fun, but eating them? That was pure, unadulterated bliss!
Now, I am thrilled to share with you this timeless recipe, a piece of my family’s heart that has brought so much joy and comfort over the years. Prepare to create your own cherished memories and perhaps even start a new family tradition with every delicious bite of mom’s jam cookies.
Ingredients for Homemade Jam Cookies
- 3 whole large eggs, at room temperature
- 3 cups all-purpose flour, plus extra for dusting
- 7 tablespoons granulated sugar
- 1 stick (8 tablespoons or 1/2 cup) unsalted butter, melted (approximately 40-50 seconds in the microwave until just liquid)
- 1 tablespoon baking powder
- 2 teaspoons pure vanilla extract
- Approximately 1/2 to 1 cup of your favorite fruit jam (strawberry, peach, raspberry, or apricot work wonderfully for their texture and flavor)
Step-by-Step Baking Instructions for Perfect Jam Cookies
- Prepare the Dough: In a large mixing bowl, combine the whole eggs, all-purpose flour, granulated sugar, melted unsalted butter, baking powder, and vanilla extract. Ensure all ingredients are added in the order listed or simply mix dry with wet after combining the wet ingredients.
- Mix Thoroughly: Using a hand mixer on a low speed, or your clean hands, thoroughly mix all the ingredients until a soft, cohesive dough forms. Knead gently for a minute or two until the dough is smooth and no dry pockets of flour remain. Avoid overmixing to keep the cookies tender.
- Rest the Dough: Cover the bowl with plastic wrap or a clean kitchen towel and allow the dough to “rest” at room temperature for at least 30 minutes. This crucial resting period allows the flour to fully hydrate, resulting in a more pliable dough that is easier to roll and shape.
- Preheat Oven & Prepare Workspace: While the dough rests, preheat your oven to 375°F (190°C). Lightly flour a clean work surface (a large cutting board or countertop works well). Prepare your baking trays by lining them with parchment paper or aluminum foil, or simply grease them lightly to prevent sticking.
- Roll and Cut: Turn the rested dough out onto the floured surface. Using a rolling pin, roll the dough evenly until it is approximately 1/8 inch thick. It’s important to aim for this thickness; rolling it too thin might result in overly crisp cookies, while too thick might cause them to bake unevenly. Use various cookie cutters to cut out your desired shapes – traditional rounds are classic, but feel free to experiment with stars, hearts, or squares for a whimsical touch!
- Arrange on Trays: Carefully transfer the cut-out cookie shapes to your prepared baking trays. Leave a small space (about half an inch) between each cookie to allow for slight spreading during baking and ensure even heat distribution.
- Bake to Perfection: Place the baking trays in the preheated oven. Bake for approximately 6-8 minutes, or until the edges are lightly golden brown and the centers are just set. It’s vital to keep a close eye on them, especially the smaller cookies, as they can bake very quickly and can easily overbake, losing their desired moist texture.
- Cool Down: Once baked, remove the trays from the oven. Let the cookies cool on the baking trays for a few minutes to firm up slightly before carefully transferring them to a wire rack to cool completely. This prevents them from breaking and ensures they are fully set before handling.
Assembling and Enjoying Your Jam Cookie Creations
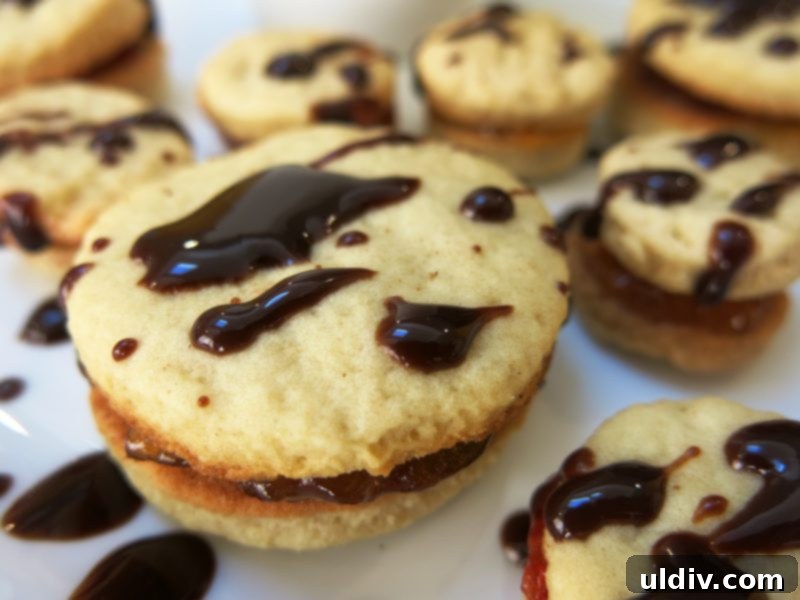
The true magic of these cookies truly begins once they have cooled completely. Now comes the delightful task of “gluing” them together! Select two cookies of similar size and shape that will form a pair. Spread a generous spoonful of your chosen fruit jam on the flat side of one cookie, ensuring an even layer. Then, gently press the second cookie on top to form a delicious sandwich, creating a beautiful jam-filled delight. For my batch, I crafted a wonderful assortment, some filled with vibrant strawberry jam, offering a burst of sweet-tart flavor, and others with the mellow, comforting sweetness of peach jam. To elevate the indulgence even further, I warmed some rich chocolate fudge topping in the microwave until it was perfectly liquid and glistening. Then, I artfully drizzled it over the assembled cookies, adding an extra layer of decadence and visual appeal that makes these homemade jam cookies even more irresistible.
These jam-filled delights can be enjoyed immediately after assembly, offering a wonderfully soft and delicate texture. However, for those with a touch more patience, waiting until the next day truly transforms them into something extraordinary. With a little time, the jam’s moisture subtly permeates the cookies, making them incredibly moist, remarkably light as a feather, and intensifying their overall flavor profile. The anticipation makes the reward even sweeter! I confess, exercising restraint with these cookies is a significant challenge for me; their allure is simply too strong to resist for too long. So, if you find yourself unable to wait an extra day, please don’t worry – I completely understand. You’re certainly not alone in succumbing to their undeniable charm and deliciousness!
More Than Just a Cookie: A Taste of Love and Legacy
Each time I gaze upon pictures of these beautiful cookies, or even just recall their exquisite taste and delicate texture, a powerful craving washes over me, compelling me back to the kitchen for “just one more.” They possess a strange, almost magical power, drawing me in with their irresistible appeal. Is it their inherent softness, their perfectly balanced moist deliciousness, or perhaps the profound sentimental value they hold for me? It must be all these elements, intertwined with countless cherished memories and the warmth of family. These aren’t merely baked goods; they are edible symbols of family, love, comfort, and the enduring legacy of a mother’s affection passed down through generations.
My recent baking session with Mom was far more than just making cookies; it was a powerful reminder of how simple pleasures and shared experiences can anchor us through life’s many transitions. It reinforced the importance of focusing on positivity, on creating joy, and on embracing the moments that truly matter, especially when faced with the bittersweet passage of time. I’ve promised Mom that I’ll continue to bake more cookies, nurturing this beautiful tradition, and in doing so, I’ll allow myself to dwell less on the melancholic onset of fall. Less pessimistic thoughts, and more creative, heartwarming baking – that has become my newly discovered, and much-loved, motto. I wholeheartedly encourage you to try this recipe, to experience the warmth and comfort it brings, and perhaps, to find your own sweet solace in the magic of homemade treats. May your kitchen be filled with the delightful aroma of these nostalgic jam cookies, and your heart with the profound joy and cherished memories they represent.